


| HIGH-TORQUE RETENTION KNOBS | |
| RETENTION KNOB SOCKETS | |
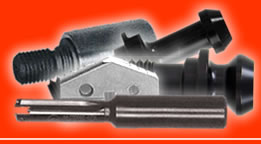
| SPADE DRILL TIPS | |
| Speeds & Feeds | |
| SPADE DRILL HOLDERS | |
| IDENTIFY or ORDER CUSTOM RETENTION KNOBS |
||
| IDENTIFY or ORDER CUSTOM SPADE DRILL TIPS |
||
| IDENTIFY or ORDER CUSTOM SPADE DRILL TOOL HOLDERS |
||
Ask for a copy of for every
set-up person and machine
operator in your facility.
![]()
Product Info |
Maintenance Info |
"Design A Special" |
Labels |
Order Online
Retention Knob Maintenance Info
FUNDAMENTALS
- Use a table and set up solid enough to insure that the work piece will not move if the tool breaks.
- Confirm that the Belleville washers have at least 80% of the pull force that the machine was designed to have.
- Ensure that the cutting tools are held securely by the toolholder to prevent push back or vibration.
- NOTE: Worn spindle bearings will cause chatter and noise. High speed machines sometimes have problems with chatter if they are run at slow RPM.
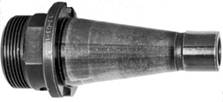
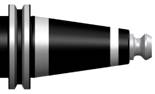
Correct Wear Pattern
Incorrect Wear Pattern
TOOLHOLDER MAINTENANCE
The toolholder should fit the spindle and show an even wear pattern from the gage line to the small end of the taper. If the toolholder does not fit the spindle, you will notice a wear pattern in two areas: one at the gage line and the other at the small end of the taper.
The wear pattern occurs when the standard retention knob has been tightened, causing the small end of the toolholder to expand and preventing the toolholder from going into the spindle far enough to seat properly. The large end of the spindle then moves in in random patterns, resulting in a burnished line from the contact of the toolholder with the spindle.
Toolholder expansion also causes the inconsistent loading of the tools in the spindle. This is one reason why the CNC mills of today cannot hold very close tolerances when boring a hole or loading a touch probe.
J&M Machine Inc. manufactures a product for checking toolholder shanks to see if the retention knob has expanded the small end of the toolholder. The Taper Shank Test Fixture checks changes in diameter as small as .000007” of an inch. The test fixture can be used after installing a retention knob or checking a toolholder that was in the machine to see if the retention knob expanded the toolholder.
ABOUT THE TAPER SHANK TEST FIXTURE

Taper Shank Test Fixture
J&M Machine used the Taper Shank Test Fixture to test different retention knobs and toolholders on the market. Their results showed that standard retention knobs made to any of the 5 world standards expand the toolholder shank at the small end when tightened to an adequate torque pressure to preload the knob.
We used the Taper Shank Test Fixture to develop our High Torque Retention Knob, which causes 2 to 10 times less expansion than standard retention knobs. Our High Torque Retention Knobs are also balanced for use in high speed applications.
INSTALLING RETENTION KNOBS
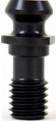
High Torque Retention Knob
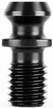
Standard ANSI Retention Knob
When installing High Torque Retention Knobs in a used toolholder, re-tap the toolholder to remove any dirt, chips, or dried oil in the threads.
Examine the retention knob for damage, nicks or scratched surfaces. Remove any imperfections that will touch the toolholder or machine gripper fingers.
Always examine the face of the toolholder the retention knob will sit against, as well as the tapered surface, making sure there are no burrs or nicks in either place.
Before installing retention knobs in the toolholder, compare the retention knob to a current retention knob that is in the machine at the present time. The retention knobs must be identical.
Always clean the retention knob and the toolholder before assembly.
Retention knobs with o-rings: examine the o-rings for signs of wear, swelling, and flat spots or cracks. Use Vaseline to lubricate o-rings and help seal off leaks.
Tighten retention knobs to J&M Machine Inc’s recommended torque settings.
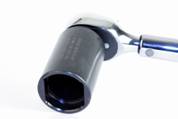
Use a socket and torque wrench to tighten retention knobs. This prevents over tightening and rounding off of the corners of the knob, while protecting the person installing the knob if the wrench slips.
CHANGING TOOLS IN THE SPINDLE/TOOL CAROUSEL
Wipe off the toolholder and retention knob with a clean shop towel before installing tools in the tool carousel. Make sure the taper angle on the toolholders is in good condition, with no nicks or scratches. Clean the tool carousel before installing the toolholder. Use a shop towel to remove grease and chips from the chain. Spray the tool socket with Stoddard Solvent, and blow off with an air hose, then spray on a light coating of oil such as WD-40.
Examine the transfer arm (which changes the tool in the spindle) to verify that keys and all parts are tight and in good condition. Clean and lubricate the transfer arm in the same way as the tool carousel.
PREPARING THE SPINDLE FOR THE NEW TOOL
Remember to clean the spindle of the machine daily, with a clean shop towel, to prevent grease and oil build up.
Examine the surfaces of the inside of the spindle for metal that is galled to the sides, and for chips and or scratches. If necessary remove them with a scraper or small file, being careful to remove only matter that galled onto the sidewalls of the spindle.
If the finish on the inside of the spindle is still too rough, use a spindle lap to smooth the surface. Start the spindle, set the speed to 120 RPM and insert the spindle lap. This will smooth the sides of the spindle and remove small particles and scratches that are on the sidewalls.
If the spindle has large amounts of material built up on the sidewalls or if the material has been torn out of the spindle, it is time to have the spindle re-ground. There are repair services that can regrind your spindle in your plant if necessary.
If all else fails, call the machine tool manufacturer and make arrangements to have the spindle removed from your machine and sent out for repair or replacement. Some manufacturers can exchange spindles for just this type of situation. They can be installed in your machine immediately after removing the damaged spindle.
Retention knobs are designed to be the weakest link between the spindle and the toolholder. For this reason, they must be replaced periodically. Monitor their condition and be sure to include retention knobs in your Safety Program.
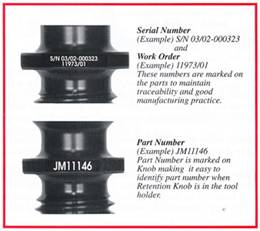
Retention knob life is approximately 6000 to 8000 hours of use. Mark the date on the knob so it can clearly be seen when the tools are changed.
J&M Machine laser marks our retention knobs so there is never a problem with traceability or a question about how long the knob has been in service.
| Expansion Problem Explained (Click icon to view video) |
|
| For End Users | |
| For Machine or Tool Dists | |
| For Machine or Tool Manfs | |
| Toolholder Deformation Test | |
| Demonstration Video | |
| » » |
View at Modern Machine Shop View at Production Machining |